Edge painting is one skill in leather crafting that is a definite test of will. There are no shortcuts to getting perfect results. It takes time, patience, and a good deal of sanding.
What is edge paint?
Edge paint is water-based paint that is designed to bond with the edge of the leather. Unlike dyes, it does not dye or soak into the leather but instead sits on top providing protection and water-resistance. It is used by many luxury leather brands and, compared with burnishing, gives a greater sense of refinement. Moreover, because the edge paint sits on top of the leather, it offers a wider and more vivid range of colours versus dyes.
Quality edge paint is also “re-heatable”. In other words, it will melt when sufficient heat is applied to it, enabling you to smooth it out and bumps and ridges.
The following is our recommended method to achieve perfect results:
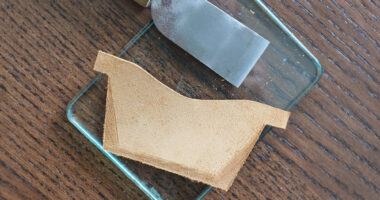
1. Prepare the edge
It’s critical to start with a flat and smooth edge. If you are edge painting two pieces of leather (or more) the bond between the leather needs to be tight—hammered down or compressed gently with some leather pliers. If the pieces are to be sewn, then this should be done before painting the edge of the leather.
Uneven or lob-sided edges need to be sanded down using 400 grit sandpaper (ideally attached to a sanding block). For edges that need quite a lot of sanding a Dremel tool with a sanding drum attached can help save time.
Do not bevel the edges! You want that sharp right-angle from flat non-bevelled edges to help “hold” the paint along the edge of the leather. It is very difficult (practically impossible) to get a straight line of paint when the edges have been beveled.
2. Apply a thin layer of edge paint
Use an awl, edge paint roller, or piece of sponge to apply a thin layer of edge paint to the edge of the leather. If any edge paint “bleeds” over onto the side of the leather you should wipe it away before it dries. Dried edge paint can be removed from the leather surface by gently rubbing it with a piece of natural rubber, but how well this works depends on the type of leather being used.
You can also use a primer for your first coat instead of directly applying paint to the edge. This isn’t necessary but can help you get to a smooth edge 1-2 layers quicker than only using edge paint.
Wait until the edge paint is completely dry before proceeding to the next steps.
3. Edge crease the leather
If you intend to edge crease your leather, it’s best to do so after the first coat of edge paint has been applied. The downward pressure from the edge creaser or fileteuse will help further seal the edge.
4. Smooth the edge paint
No matter how well you prepare your surface, the first layer of edge paint will be blotchy and unattractive. The paint needs to be smoothed out with the tip of a creasing iron. Ordinary edging irons will work but for those with an electric edge creaser a S05 tip (single edge creasing tip without an edge guide) is ideal and used by many professionals. Applying heat in this way also ensures that the paint is 100% dry before you begin to sand.

The melting temperature of edge paint is such that you’ll need to use a high temperature setting on your creasing machine (on a REGAD M3000, we use setting “7-8”). Once the tip is at this temperature, the paint will “boil” if you linger on any spot for more than a second, so it’s important to move along the edge in a continuous movement. Do the same along the edge corner with the iron at a slight angle so as to ensure that the paint melts and covers all the way up to the corners of the leather, too.
5. Sand the edge
After you have smoothed the paint with a creasing iron, sand it with 400 or 800 grit sandpaper. The objective here is to get the surface as flat and smooth as possible (melting the paint with the edge creaser tip will smooth out the larger bumps but only sanding will get it perfectly flat and smooth).

6. Add more layers of edge paint
Repeat steps 2, 4, and 5 but this time apply a slightly thicker layer of edge paint (we recommend using an awl for precision). You can use progressively higher grit sandpaper (800, 1200, etc.), but once the grit 400 sandpaper has edge paint residue on its surface it is less abrasive so you can do all the sanding with a single piece of sandpaper. To get a perfectly smooth edge you’ll often need 3 or 4 layers of edge paint.

For the final layer, spread a thin layer of paint with a piece of sponge. It should dry within minutes if not less. Once dried take a 2000 or 2500 high grit paper and gently sand it down. The point here is just to take the sheen off the dried paint and not to smooth out the edge (which should be free of any bumps or patches). This simple step only takes a few minutes but can make the difference between a very good and perfect edge.
7. Protect the paint and give the edge a sheen
The final step is to add a little bit of wax to protect the edge paint and give it a nice sheen. For this you can use beeswax, Columbus wax or paraffin wax. Beeswax and Columbus wax arguably gives the edge a little more protection, whereas paraffin wax is easier to apply, produces a little more sheen, and leaves an edge that is clean to the touch.
Whichever you use, apply the wax by rubbing it along the edge. Some people go a step further and use a waxing iron to melt the wax and help it spread more evenly (or a creasing iron and set the fileteuse to a lower temperature because you want to melt the wax but not the edge paint!), but this isn’t necessary.
When the wax has been evenly applied, take a high quality canvas cloth and, without applying too much pressure, rub vigorously back-and-forth along the edge until the wax starts to works its way into the paint giving it a subtle sheen. Do the same along the corner of both edges with the leather flat on a hard surface.
Buffing in this way requires a bit of effort—you should be able to feel the heat from the friction in your fingertips.
Finally, take a cloth (high denier denim is good) and give the edge a final rub to remove any excess wax. You should now have a beautiful and long-lasting edge to your leather.